Wednesday, September 15, 2010
Ready for some R and R...
I don't know about you, but this is a really crazy time of year for me. These last couple of weeks I feel like I've been just running from one meeting to the next with the moments in between spent working furiously away on my laptop for one project or another. Although my busy time isn't over yet I really feel like I need a break, even a tiny one, to keep my energy up so I can jump through all of the hoops I need to jump through!
For me, nothing says relaxation like a lazy weekend morning with some cooking magazine (or Food Network), big mugs of coffee, and a delicious breakfast that you don't even need to get out of your pajamas to eat. Those long mornings are sometimes few and far between but there's something so wonderfully cozy about them that they really keep me going even when I feel like my weekdays are a blur of madness. The perfect weekend breakfast should be something you wouldn't make for yourself on a weekday but not so cumbersome that your morning is spent in a blur of kitchen madness (but don't get me wrong, I do love an all-consuming project from time to time).
Sometimes I make pancakes, or dressed-up oatmeal, or even simple breakfast pastries. However, my new favorite may be biscuits. I love biscuits primarily because I was absolutely terrified of them for ages but Alton Brown really showed me that if you can make a pie crust, you can make a biscuit. So, I cast my fears aside and have now made biscuits several times. My triumph over fear is not the only reason you should really make biscuits this weekend. Not only are they versatile in that they are delicious with jam and butter and even better as a breakfast sandwich (my favorite is bacon, an over-easy egg, and perhaps a slice of good cheese) but biscuits freeze really well. I'm not kidding when I say that these were even better when I baked them straight from the freezer; being super cold early on really helped them puff up later. Unfortunately, we devoured those immediately, leaving no time for a photo-op.
Oversize Breakfast Biscuits
Originally published in Food and Wine, September 2010.
Note: These freeze beautifully. I think they were even better the second time around. To freeze the biscuits, stop after step 2 and place the biscuits on a parchment-covered baking sheet and put the whole thing in the freezer. Several hours later, after the biscuits are solid, place the frozen biscuits in a ziplock bag. When you next lazy morning rolls around, heat the oven to 475 and increase the baking time by a few minutes, but be sure to check on them!
Makes 6 very large biscuits
2 cups all-purpose flour, plus more for dusting
1 teaspoon kosher salt
1 tablespoon plus 1/4 teaspoon baking powder
1/2 teaspoon baking soda
2 tablespoons chilled solid vegetable shortening
5 tablespoons unsalted butter—3 tablespoons thinly sliced, 2 tablespoons melted
1 cup buttermilk
1. Preheat the oven to 475°. Position a rack in the upper third of the oven. In a large bowl, whisk the 2 cups of flour with the salt, baking powder and baking soda. Using a pastry blender, cut in the shortening until the mixture resembles coarse meal. Using your fingers, rub in the sliced butter, leaving large flakes of coated butter. Freeze the mixture until very cold, about 15 minutes.
2. Stir in the buttermilk until a raggy dough forms. Transfer the dough to a lightly floured work surface and press or roll into a 9-by-7-inch rectangle, about 3/4 inch thick. Fold the rectangle in thirds like a letter, then fold the rectangle in half to make a little package. Press or roll out the dough to a 9-by-7-inch rectangle again. Repeat the folding process once more, then roll the dough out one more time to a 9-by-7-inch rectangle. Using a 3 1/2-inch round cutter, stamp out 4 biscuits. Pat the scraps together and stamp out 2 more biscuits.
3. Arrange the biscuits on a large baking sheet and brush the tops with the melted butter. Bake for about 14 minutes, shifting the baking sheet halfway through, until the tops and bottoms are golden and the biscuits are cooked through.
Tuesday, September 7, 2010
Finally...
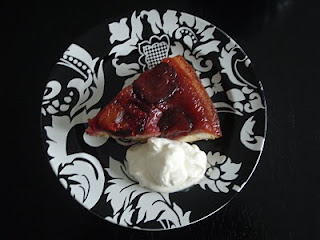
I have been waiting for this time of year since, well, last year. Readers, it is Italian Prune Plum Season!!
When I saw these little beauties in the grocery story I shrieked with joy. The other shoppers probably thought I was crazy (Jared certainly did). I couldn't help myself as I love, love, love these delicious fruits and they come but once a year, like so many fruits and vegetables I yearn for all year long. Italian prune plums are only available in late summer/early fall and if you see them in your produce aisle I strongly suggest that you grab a dozen or two.
Not only do I love these little plums because they are harbingers of cool autumn days, but they also look like they rolled out of a Dutch Master's still life AND they're a key ingredient for one of my favorite cakes ever. So many reasons to love them.
My love affair really started before I'd ever laid eyes on the fruit, however. I became infatuated with Ina Garden's Plum Cake Tatin years ago when I saw it on Barefoot Contessa. I wanted to make that pretty little cake so badly, but I didn't know where I could find the tiny plums that graced the top. Then, one autumn day they just appeared in the produce section and the rest is history. I've waited for them every year since and pick up a small bag whenever I find them.
But really, this post is all about the cake. And this cake is fantastic. Knitters sometimes talk about being process vs. product knitters which boils down to knitting a project because you enjoy the act of knitting it or because you want the end product (the sweater, hat, socks, etc.). This cake is rewarding in both in terms of process and product. The cake comes together quickly, but looks impressive and it involves some very basic candy making. Which is fantastic because I'm always looking for ways to improve my candy making skills without making dozens of lollipops in July and this is the perfect excuse.
Even better, this cakes will remain delicious stashed in the fridge for days which means you can have it for dessert one night and then for breakfast again the next day (and repeat)!
Plum Cake "Tatin"
Originally published in Barefoot in Paris by Ina Garten
Note: I hear you can substitute apples or pears, but even Jared loves this cake and he is not generally a fan of stone fruit. I followed Ina's suggestion of whipped cream as an accompaniment but it's also perfectly delicious on its own. Especially for breakfast.
Serves 6
6 tablespoons (3/4 stick) unsalted butter, at room temperature plus extra for greasing the dish
10 to 12 Italian prune plums, cut in half and pitted
1 3/4 cup granulated sugar, divided
2 extra-large eggs, at room temperature
1/3 cup sour cream
1/2 teaspoon grated lemon zest
1/2 teaspoon pure vanilla extract
1 cup plus 2 tablespoons all-purpose flour
1/2 teaspoon baking powder
1/4 teaspoon salt
1. Preheat the oven to 350 degrees. Generously butter a 9-inch glass pie dish and arrange the plums in the dish, cut side down.
2. Combine 1 cup of the granulated sugar and 1/3 cup water in a small saucepan and cook over high heat until it turns amber color, about 360 degrees on a candy thermometer. Swirl the pan but don't stir. Pour evenly over the plums.
3. Meanwhile, cream the 6 tablespoons of butter and the remaining 3/4 cup of granulated sugar in the bowl of an electric mixer fitted with the paddle attachment, until light and fluffy. Lower the speed and beat in the eggs one at a time. Add the sour cream, zest, and vanilla and mix until combined. Sift together the flour, baking powder, and salt and, with the mixer on low speed, add it to the butter mixture. Mix only until combined.
4. Pour the cake batter evenly over the plums and bake for 30 to 40 minutes, until a cake tester comes out clean. Cool for 15 minutes, then invert the cake onto a flat plate. If a plum sticks, easy it out and replace it in the design on the top of the cake. Serve warm or at room temperature.
Sunday, September 5, 2010
Happy Labor Day Weekend
Unbelievably, tomorrow is Labor Day which means summer is coming to a close.
Admittedly, I feel bittersweet about the end of summer this year. This summer was busier than I expected and with everything going on, I got into a bit of a funk and feel like I never really gave it my best shot. I didn't eat enough tomatoes, it was far too hot to garden, and I spent a lot of time indoors rather than out. Okay, I'm from the North so to me summers are for outdoor activities but everyone I know in the South says that's crazy talk and summers are spent indoors which is understandable when it's in the 90's and near 100% humidity every single day but I miss long hikes and lazy afternoons near a lake.
However, life is not all bad. I'm really looking forward to cooler weather (no surprise there) as well as sweaters, autumn produce, Halloween, and caramel themed desserts like this, this, and this. Further, fall has always been a favorite time of year for me because I think it's the most exciting fashion season of them all. I think Vogue agrees with me, given that the September issue generally weighs as much as Kate Moss and is chock full of the most beautiful spreads. I even love to pore over the ads. Don't even get me started on the knitting patterns that will be coming out as I may just swoon and forget that we're talking about summer! The fireflies haven't closed their nightly show for the year just yet!
Since this weekend is the perfect excuse to squeeze in a picnic, I wanted to share with you one of my favorite sandwiches of all time. This is the sandwich I instantly think of when I'm planning a picnic and it's no secret that I like to picnic often. It's even the sandwich we toted along on the picnic over which I promised Jared my hand in marriage (I told you I love picnics). What I love most about this sandwich is that not only are the main ingredients are either easy to come by or I already have them in my pantry but that it really takes substitutions well. No ciabatta to be found at you grocer? No problem; any toasted, crusty loaf would be delicious. No pancetta? I've used bacon in its place many, many times.
The dressing is what really makes the sandwich sing so substituting other things for what you have on hand or what is more pleasing to your palate is easy. The only thing I wouldn't do is skip the anchovy paste. I know, I know: I don't like fish, anchovies smell, etc. But trust me, you won't taste them as fish, but rather as a salty, savory note. Plus, the paste saves forever and has tons of extra uses once you get over the anchovy "yuck factor" (and believe me, it was definitely a food that took me some courage to try but now I use them all the time). Finally, this beauty travels well and can serve six if you have lots of extras to go with it or two if you count on extra sandwiches for lunch the next day. So now you have no excuses: pack one of these along on an outing and celebrate the last weekend of summer in style!
Caesar Club Sandwich
Originally Published in Barefoot Contessa at Home by Ina Garten.
Note: I have made many substitutions in this recipe but I'll give you my top two and just encourage you to be adventurous. First, I almost always have bacon on hand but I generally just buy pancetta for a special occasion so feel free to substitute there. Obviously, a better bacon will give you a better result but you don't need artisinal bacon to have a delicious sandwich! Second, my fiancee doesn't love arugula, so I have used baby spinach and romaine lettuce instead both of which work equally well and aren't as bitter as the arugula Ina calls for.
Makes 1 Giant Sandwich, easily sliced into 4 sandwiches or 6
2 split chicken breasts
4 oz thinly sliced pancetta (or bacon)
1 large garlic clove, chopped
2 tablespoons flat leaf parsley, chopped
1 1/2 teaspoons anchovy paste
1 teaspoon Dijon mustard
1 1/2 tablespoons fresh lemon juice
1/2 cup mayonnaise
1 large ciabatta bread
2 ounces baby arugula (or spinach, or romaine)
12 sun-dried tomatoes in oil
2-3 oz. Parmesan, shaved
Directions
1. Preheat oven to 350 degrees. Places chicken skin side up on a sheet pan. Rub the chicken with olive oil and sprinkle with salt and pepper. Roast for 35 to 40 minutes, until cooked through. Cool slightly, discard the skin and bones, and slice the meat thickly. Set aside.
2. Meanwhile, place the pancetta on another sheet pan in a single layer. Roast for 10 to 15 minutes, until crisp. Set aside to drain on paper towels.
3. Place the garlic and parsley in the bowl of a food processor fitted with a steal blade and process until minced. Add the anchovy paste, mustard, lemon juice, and mayonnaise and process again to make a smooth dressing. (Refrigerate dressing if not using immediately.)
4. Slice the ciabatta in half horizontally and separate the top from the bottom. Toast the bread in the oven, cut side up, for 5 to 7 minutes; cool slightly. Spread the cut sides of each piece with the Caesar dressing. Place half the arugula on the bottom piece of bread and then layer in order: the sun-dried tomatoes, shaved Parmesan, crispy pancetta, and sliced chicken. Sprinkle with salt and pepper and finish with another layer of arugula. Place the top slice of ciabatta on top and cute into desired size. Serve at room temperature.
Saturday, August 7, 2010
Birthday Pie
One of the first things I ever learned about Jared is that he loves Key Lime Pie and that his mother made him one every year for his birthday growing up. This was a foreign concept to me, as every birthday in our house throughout my childhood meant a 2-layer homemade cake with lots of fluffy buttercream. On the other hand, birthdays should be filled with fun and favorite things so I rolled with it and I made him Ina Garten's frozen key lime pie two years in a row (which is extremely tasty, btw).
This year, when I once again asked him what he would like for his birthday dessert and replied that his heart desired key lime pie I knew I was going to make the real deal. Complete with the tiny key limes I had spied at the store the previous week.
Can I tell you how simple and delicious this pie is? The filling contains only 4 ingredients, 3 if you lump lime juice and zest together. Plus, it's all on graham cracker crust which means you don't even need to haul out any equipment unless you use the food processor to grind up the crackers. I'm a total convert: key lime pie is the quintessential summer dessert!
Key Lime Pie
Originally Published on Martha Stewart.com
Note: I saw somewhere on Chowhound (and I wish I had the post, I apologize) someone suggested that a (very clean) garlic press makes quick work when juicing a small mountain of key limes and it absolutely works like a dream. Also, I bought a 1lb bag of limes, which was more than enough. I believe I have around 10 limes left, which I'm still trying to find a use for but they whole bag was just a few dollars. Obviously, I highly recommend going the whole lime route rather than reaching for the bottled stuff.
Makes 1 pie
1 1/2 cups graham-cracker crumbs
6 tablespoons unsalted butter, melted and cooled
5 tablespoons sugar
1 can (14 ounces) can sweetened condensed milk
4 large egg yolks
1/2 cup freshly squeezed key-lime juice
1 tablespoon grated key-lime zest, plus more for garnish
1 1/2 cups heavy cream, chilled
Directions
1. Heat oven to 375 degrees. Combine graham-cracker crumbs, butter, and 3 tablespoons sugar in a medium bowl; mix well. Press into a 9-inch pie plate, and bake until lightly browned, about 12 minutes. Remove from oven, and transfer to a wire rack until completely cooled.
2. Lower oven to 325 degrees. In a medium bowl, gently whisk together condensed milk, egg yolks, key-lime juice, and zest. Pour into the prepared, cooled crust.
3. Return pie to oven, and bake until the center is set but still quivers when the pan is nudged, 15 to 17 minutes. Let cool completely on a wire rack.
4. Shortly before serving, combine cream and remaining 2 tablespoons sugar in the bowl of an electric mixer fitted with a whisk attachment. Whisk on medium speed until soft peaks form, 2 to 3 minutes. Spoon over cooled pie; garnish with zest. Serve immediately.
Thursday, August 5, 2010
A Little Secret
Dear Reader,
Lend me your ear and I'll tell you a little secret. I bribe myself into doing things I'd rather not do. Often my fellow grad students ask how it is that I find the time to read, write, attend meetings, grade homework AND bake cupcakes, go on picnic adventures, and knit. I don't tell them how, because it sounds very silly and I may get some eye rolls, but I really do just bribe myself into it.
For example, I've been working on a couple of mega projects lately (including my thesis) which include dozens of little tasks I may not feel like doing any given morning. To make sure I cross a few off of my list each day I bribe myself by saying something like, "If I work on (insert boring task here) all morning, in the afternoon I'll make that recipe I've been dying to try and plan a wee picnic for the weekend."
So simple. And it really makes me feel much better as I trudge through the day. Because really, I'm just not always thrilled to start my day with pages and pages of data entry. I need something to look forward to in my life. When I spent a (very) brief period as a collector for a credit card company I daydreamed of the delicious pancakes I would make over the weekend or compile my Christmas cookie list between calls. Believe me, this made an unpleasant job much, much better. (Plus, I read once that Martha Stewart likes to do the same thing, breaking up the workday with a few minutes for hobbies. I did not make this up.)
And that is how I got into making this set of coasters. I had loved them the moment I saw them in Martha Stewart Living (MSL) ages ago, but when I really needed something to get me out of my funk and trudge ahead with data coding, this is what inspired me. The project is really easy once you get the hang of the quilting and I highly recommend making them like an assembly line: cut them all, stitch all of the sides, stuff the little things, and quilt away! It's almost meditative and I love projects like that. Also, a walking foot is a must-have. Trust me on this. I tried with my machine's regular foot before locating my walking foot and it wasn't pretty: lots of frustration, wasted thread, and seam ripping.
Bonus: I used some old cotton batting I had on hand and leftover fabric from a screen I made for my mother so this project was not only extremely inexpensive but it also coordinates with my black and white dishes and dining room.
Project from MSL October 2007
Wednesday, August 4, 2010
Amazing Finds
Being a grad student, I already don't make a lot of cash. But saving up for a wedding and having a fiancee who is enrolling in fall classes means that money right now is a bit tight.
That doesn't mean, however, that we want to spend our weekend unwind time staring at the walls and discussing the finer points of Top Ramen (which we don't eat, btw... although I did see Alton Brown use them once and I've been tempted since). We may not be the kind of couple who has ever gone out all weekend and closed the bars down, but we do like to create our own adventures be it visiting museums and exploring national parks or trying out a new crab cake recipe. Needless to say, we haven't made crab cakes lately and every time I order them at a restaurant I wish I hadn't. That's a story for another day.
Lately, we've dusted off what was more of a hobby for me in high school and has only been practiced sporadically since. I am talking about thrifting.
Way back when, I frequented thrift stores near and far to find cool silk ties for cheap (pre-Avril, thank you), vintage purses, and anything with cool fabric that I could rework into whatever my imagination came up with. Over the years, and especially after going to FIT and getting into knitting, my fiber tastes changed which led to a sharp decrease in thrifting activity. I am the first to admit I'm a bit "snobby" about some things, although I kind of hate that it's put that way. I feel that I have simply learned a great deal about my hobbies and why some things are more valuable than others and I appreciate that information. Regardless, I rediscovered thrifting recently as I moved into a bigger space and need some new furniture and have some more room for kitchen accoutrement.
I wanted to share a bit of my haul today because I was really just too excited.
I'll introduce my favorite find from this past weekend by saying that Jared is a collector of books so when we enter a store he makes a beeline for the books and I head straight to housewares. Don't get me wrong, I check out the books and occasionally pick up a few, but I rarely find much of what I'm looking for. For those of you unfamiliar, thrift store book areas tend to be full of grocery store romance novels, Danielle Steele, B-list celebrity autobiographies, passe diet books, and books people were forced to read in school. Luckily for Jared, his love of philosophy and both Russian and post-modern literature means he finds a fair number of books. As for me, I don't find much Jane Austen. Anyway, we were in the Salvation Army which keeps its book section in its own room making it feel very much like a book store. Jared was looking for extra copies of The Brothers Karamazov, I was browsing cookbooks and several other people were checking out the shelves.
Then I saw one.
"Oh wow. No way. Jared! I found a James Beard! This is mine!"
I excitedly scooped up the copy of The New James Beard. Then, right next to it on the shelf, I saw another. And another. And another!
"What? No way! There are FOUR James Beard books here! Beard on Bread is here? I was just reading about this! Jared this book is classic! I'm getting all of these. I just can't believe this!"
So there I was, giddily chattering on and on; I'm sure the other patrons thought my mother did not teach me how to behave. She did! I promise! I just got carried away. I also scooped up a Food and Wine book, which looks good so far. But the Beard cookbooks! I'm still thrilled. I bought them all plus a few pieces of glassware for $6.
Here's a closeup on the illustrated covers from Beard on Bread and Beard on Pasta. I just love them.
I admit I have only made one thing so far, which was Linguine with Tomato-Shrimp Sauce. I didn't take any pictures and to be honest, I really didn't follow the whole recipe. What I love most is he encourages the reader to go with the flow and try new things. Essentially, I reheated some of my usual tomato sauce, threw in some shrimp, extra garlic and a bunch of red pepper flakes and tossed it with pasta. And it was delicious. I would have never tried it but it was fantastic and so fast. Trust me, if you find a copy of James Beard book buy it. Do not let it go. The man is an icon for a reason.
In the coming weeks and months I look forward to pouring over these gems and making many of the recipes such as filled doughnuts, basil lasagna, German fried potatoes, etc.
In the meantime, I highly suggest you do what my clever fiance did and search for thrift stores in your area and check out one or two each week. We live in a large metropolitan area that's also very transient so our list is lengthy but it gives us something to look forward to each and every weekend for months to come.
Other fantastic finds this week:
- $0.25 Tart pan
- $6.00 Brand-new OXO salad spinner
- $0.90 Pair of small round vases
Monday, July 19, 2010
Not good.
I will start this post by saying how much I was looking forward to moving. I'd never lived in an apartment until about two years ago and ever since I have longed to have a bit more space both indoors and out (how I dreamed of a yard)! So when we found a house to rent in an adorable neighborhood with a big yard, all new cabinets, floors, etc. and plenty of space (the kitchen seemed huge!) and all within our price range we were thrilled. I can openly admit that I spent the last month dreaming of the garden I would grow, the decorating I would do and the charming dinner parties I would throw.
But when we moved in, things went south. Fast. Much of it seemed like little things: the storm door (which I am itching to remove) doesn't close quite right, the new plumbing under the sinks leak, etc. This didn't bother me so much as I expect when the place was gutted and updated, there would be a few hiccups as new construction often has.
However, yesterday brought an absolute nightmare. I was placing a few of my late Grandmother's dishes into a kitchen cupboard when I heard a sound. I said to my fiancee, "I think something is shifting...."
He had a look and we both believed it was the shelf or a plate until he discovered that the whole cupboard was pulling away from the top of the wall. That's when he said, "We need to get everything out of the cabinets now!"
As he reached up to start unloading the whole thing fell into his arms and dishes rained down on the floor. We lost so many... our everyday dished, some of our cereal bowls, my favorite broiler-safe crocks from Williams-Sonoma, and last but not least a good number of my Grandmother's dishes. They all lay smashed on the counter, the floor, the sink... it was too much. Hysterical and inconsolable are words that may have described me at that moment.
Of course, I think to myself, "If only I had known! I would have placed them on the lower shelves... or in boxes... or...." But it's no use. Poor Jared blamed himself for not catching enough of them as they tumbled down. At the end of the day, however, the fault lies with neither one of us. Upon further inspection, the cabinets are hung like one may hang a picture: simply drilled into the wall with absolutely no anchors. When I think of it now, I am no longer sad. I am angry. I cannot believe that anyone would complete such shoddy work and I cannot believe it is up to code. Imagine if it had fallen on one of our heads!
When we went to bed last night, we were both in very bad spirits, wondering if we had chosen an absolute lemon of a house. My dreams of gardening vegetables and hydrangeas, Pizza Fridays with friends, and making my rental into a real home were all dashed. However, Jared spoke with the landlord today who seemed to be very understanding and offered to compensate us for the dishes, which was very much appreciated.
The contractor is supposed to arrive this afternoon, but knowing it's the same guy who is responsible for the destruction of my cherished dishes leaves me with mixed feelings. I'm thrilled I will have cabinets to unpack into, but can I really trust his workmanship? Are my cabinets destined to house only cereal and dried pasta? Then there's the matter of what to say to him. I'm so furious about the whole thing that I feel I must say something. But at the same time, I don't want to be rude or let my emotions get the best of me. Either way, I will certainly be watching to make certain that the cabinets are installed to my standards.
Wish me luck.
Edited to add a few pictures of the carnage. Those faint of heart should look away.
Tuesday, June 8, 2010
A lovely break from the everyday...
Things have been a bit crazy here, lately. I always have these visions of lovely summers full of picnics and road trips but it seems every summer I move into a new place, line up way too many projects or have some sort of major life event. This summer: check, check and check! Then again, if life were like my fantasies I would have nothing to look forward to, nothing to reach for.
Regardless, I took a brief break the other day to make a batch of something I use often but hadn't made in quite some time: tomato sauce. Mario Batali's Basic Sauce from Molto Italiano, to be precise. I love this sauce. It's become the sauce I turn to and always have on hand. In the book, Mario uses it again and again transforming it with bacon or peppers to create a multitude of dishes, which is absolutely fantastic. However, I use it even more often as my go-to pizza sauce for Pizza Friday (more on that, later).
But it isn't just the possibilities that I love about this sauce. What I really love is that the ingredients are so simple you probably already have most everything on hand and the recipe is mastered quickly so you'll be tweaking it to your tastes in just a batch or two. Jared, my fiancee, loves to add red pepper flakes, garlic, and even jalapenos to his sauce but he never does make a recipe by the book. This time, I added some spent parmegiano reggiano rinds when I threw in the tomatoes (2 smallish rinds) and it may be my best version yet. I wasn't sure it would make much difference, but as soon as it started to simmer I could smell the cheese in with the tomatoes and the flavor was light but unmistakable, unlike the jarred sauces I tend to avoid. I've turned over ideas of roasted garlic versions or one with sun-dried tomatoes, but I have yet to give them a try; another project for another day!
Basic Tomato Sauce
Originally Published in Molto Italiano by Mario Batali
Ingredients
1/4 cup extra-virgin olive oil
1 Spanish onion, 1/4-inch dice
4 garlic cloves, peeled and thinly sliced
3 tablespoons chopped fresh thyme leaves, or 1 tablespoon dried
1/2 medium carrot, finely grated
2 (28-ounce) cans peeled whole tomatoes, crushed by hand and juices reserved
Salt
Directions
1. In a 3-quart saucepan, heat the olive oil over medium heat.
2. Add the onion and garlic, and cook until soft and light golden brown, about 8 to 10 minutes. Add the thyme and carrot, and cook 5 minutes more, until the carrot is quite soft.
3. Add the tomatoes and juice and bring to a boil, stirring often. Lower the heat and simmer for 30 minutes until as thick as hot cereal. Season with salt. This sauce holds 1 week in the refrigerator or up to 6 months in the freezer.
Sunday, June 6, 2010
Strawberry Cookies and things to come...
This weekend, we had dinner with some friends of ours which seemed to be the perfect opportunity to bake up something summery. I wanted to do something with fruit, so I thought I would either make a tart or a strawberry-something-or-other (being the very end of their season in these parts). Whenever I make something with fresh fruit I try to go into it without too many specific expectations of what to make or even what fruit to buy. Instead, I head out with an open mind ready to come home with whatever looks and, more importantly, smells the very best as your nose will almost always tell you what fruit is freshest and ripest. When I saw the strawberries at the market and breathed in their heavenly aroma, I knew it was time to give this recipe a try.
I found these cookies in Martha Stewart Living some time ago (June 2009, to be exact). I came back to them several times but put them aside because 1.) good strawberries weren't available at the time 2.) the recipe states they only keep for one day and 3.) I generally bake for other people or events and the time just hadn't come yet. But Saturday the time finally came. They seemed light enough to go with the lasagna, I had strawberries in hand and the recipe makes a relatively small number of cookies which made me less concerned about their short shelf life.
When they came out of the oven, these babies were heavenly. Really, they are just like if you sweetened a shortcake biscuit and swirled the strawberries in. However, I have a few notes. Aside from the berries, nearly everything needed to bake up these cookies is probably in your fridge or pantry and on a personal note they finally gave me an excuse to use my grandmother's pastry blender so that's all very fantastic. However, Martha is not kidding about these cookies only keeping for one day. Although they were absolutely perfect 10-20 minutes from the oven, several hours later when I brought them to dinner they were already getting soggy. There go all of my visions of packing them in a picnic. They really should be consumed immediately, but if you have a cookie-loving maniac in your household like I do that really shouldn't be a problem.
Also, the original recipe said to "sprinkle" the sanding sugar, but that really wasn't adequate. To get that fantastic crunchy, sugary bite I found it was necessary to really pour it on, beyond what one would think is necessary as the cookies do expand and some of the sugar will be absorbed into puddles of liquefied strawberries.
Strawberry-Shortcake Cookies
Originally Published in Martha Stewart Living, June 2009
Ingredients
12 ounces strawberries, hulled and cut into 1/4-inch dice (2 cups)
1 teaspoon fresh lemon juice
1/2 cup plus 1 tablespoon granulated sugar
2 cups all-purpose flour
2 teaspoons baking powder
1/2 teaspoon coarse salt
3 ounces (6 tablespoons) cold unsalted butter, cut into small pieces
2/3 cup heavy cream
Sanding sugar, for sprinkling
Directions
1. Preheat oven to 375 degrees. Combine strawberries, lemon juice, and 2 tablespoons granulated sugar. Whisk together flour, baking powder, salt, and remaining 7 tablespoons granulated sugar in a large bowl. Cut in the butter with a pastry cutter, or rub in with your fingers, until mixture resembles coarse crumbs. Stir in cream until dough starts to come together, then stir in strawberry mixture.
2. Using a 1 1/2-inch ice cream scoop or a tablespoon, drop dough onto baking sheets lined with parchment, spacing evenly apart. Sprinkle with sanding sugar, and bake until golden brown, 24 to 25 minutes. Transfer to a wire rack, and let cool. Cookies are best served immediately, but can be stored in an airtight container at room temperature for up to 1 day.
Subscribe to:
Posts (Atom)