Wednesday, September 15, 2010

Ready for some R and R...


I don't know about you, but this is a really crazy time of year for me. These last couple of weeks I feel like I've been just running from one meeting to the next with the moments in between spent working furiously away on my laptop for one project or another. Although my busy time isn't over yet I really feel like I need a break, even a tiny one, to keep my energy up so I can jump through all of the hoops I need to jump through!

For me, nothing says relaxation like a lazy weekend morning with some cooking magazine (or Food Network), big mugs of coffee, and a delicious breakfast that you don't even need to get out of your pajamas to eat. Those long mornings are sometimes few and far between but there's something so wonderfully cozy about them that they really keep me going even when I feel like my weekdays are a blur of madness. The perfect weekend breakfast should be something you wouldn't make for yourself on a weekday but not so cumbersome that your morning is spent in a blur of kitchen madness (but don't get me wrong, I do love an all-consuming project from time to time).

Sometimes I make pancakes, or dressed-up oatmeal, or even simple breakfast pastries. However, my new favorite may be biscuits. I love biscuits primarily because I was absolutely terrified of them for ages but Alton Brown really showed me that if you can make a pie crust, you can make a biscuit. So, I cast my fears aside and have now made biscuits several times. My triumph over fear is not the only reason you should really make biscuits this weekend. Not only are they versatile in that they are delicious with jam and butter and even better as a breakfast sandwich (my favorite is bacon, an over-easy egg, and perhaps a slice of good cheese) but biscuits freeze really well. I'm not kidding when I say that these were even better when I baked them straight from the freezer; being super cold early on really helped them puff up later. Unfortunately, we devoured those immediately, leaving no time for a photo-op.

Oversize Breakfast Biscuits
Originally published in Food and Wine, September 2010.

Note: These freeze beautifully. I think they were even better the second time around. To freeze the biscuits, stop after step 2 and place the biscuits on a parchment-covered baking sheet and put the whole thing in the freezer. Several hours later, after the biscuits are solid, place the frozen biscuits in a ziplock bag. When you next lazy morning rolls around, heat the oven to 475 and increase the baking time by a few minutes, but be sure to check on them!

Makes 6 very large biscuits

2 cups all-purpose flour, plus more for dusting
1 teaspoon kosher salt
1 tablespoon plus 1/4 teaspoon baking powder
1/2 teaspoon baking soda
2 tablespoons chilled solid vegetable shortening
5 tablespoons unsalted butter—3 tablespoons thinly sliced, 2 tablespoons melted
1 cup buttermilk

1. Preheat the oven to 475°. Position a rack in the upper third of the oven. In a large bowl, whisk the 2 cups of flour with the salt, baking powder and baking soda. Using a pastry blender, cut in the shortening until the mixture resembles coarse meal. Using your fingers, rub in the sliced butter, leaving large flakes of coated butter. Freeze the mixture until very cold, about 15 minutes.

2. Stir in the buttermilk until a raggy dough forms. Transfer the dough to a lightly floured work surface and press or roll into a 9-by-7-inch rectangle, about 3/4 inch thick. Fold the rectangle in thirds like a letter, then fold the rectangle in half to make a little package. Press or roll out the dough to a 9-by-7-inch rectangle again. Repeat the folding process once more, then roll the dough out one more time to a 9-by-7-inch rectangle. Using a 3 1/2-inch round cutter, stamp out 4 biscuits. Pat the scraps together and stamp out 2 more biscuits.

3. Arrange the biscuits on a large baking sheet and brush the tops with the melted butter. Bake for about 14 minutes, shifting the baking sheet halfway through, until the tops and bottoms are golden and the biscuits are cooked through.

Tuesday, September 7, 2010

Finally...


I have been waiting for this time of year since, well, last year. Readers, it is Italian Prune Plum Season!!

When I saw these little beauties in the grocery story I shrieked with joy. The other shoppers probably thought I was crazy (Jared certainly did). I couldn't help myself as I love, love, love these delicious fruits and they come but once a year, like so many fruits and vegetables I yearn for all year long. Italian prune plums are only available in late summer/early fall and if you see them in your produce aisle I strongly suggest that you grab a dozen or two.

Not only do I love these little plums because they are harbingers of cool autumn days, but they also look like they rolled out of a Dutch Master's still life AND they're a key ingredient for one of my favorite cakes ever. So many reasons to love them.

My love affair really started before I'd ever laid eyes on the fruit, however. I became infatuated with Ina Garden's Plum Cake Tatin years ago when I saw it on Barefoot Contessa. I wanted to make that pretty little cake so badly, but I didn't know where I could find the tiny plums that graced the top. Then, one autumn day they just appeared in the produce section and the rest is history. I've waited for them every year since and pick up a small bag whenever I find them.

But really, this post is all about the cake. And this cake is fantastic. Knitters sometimes talk about being process vs. product knitters which boils down to knitting a project because you enjoy the act of knitting it or because you want the end product (the sweater, hat, socks, etc.). This cake is rewarding in both in terms of process and product. The cake comes together quickly, but looks impressive and it involves some very basic candy making. Which is fantastic because I'm always looking for ways to improve my candy making skills without making dozens of lollipops in July and this is the perfect excuse.

Even better, this cakes will remain delicious stashed in the fridge for days which means you can have it for dessert one night and then for breakfast again the next day (and repeat)!


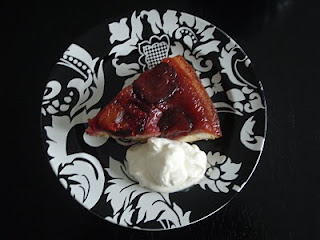
Plum Cake "Tatin"
Originally published in Barefoot in Paris by Ina Garten

Note: I hear you can substitute apples or pears, but even Jared loves this cake and he is not generally a fan of stone fruit. I followed Ina's suggestion of whipped cream as an accompaniment but it's also perfectly delicious on its own. Especially for breakfast.

Serves 6

6 tablespoons (3/4 stick) unsalted butter, at room temperature plus extra for greasing the dish
10 to 12 Italian prune plums, cut in half and pitted
1 3/4 cup granulated sugar, divided
2 extra-large eggs, at room temperature
1/3 cup sour cream
1/2 teaspoon grated lemon zest
1/2 teaspoon pure vanilla extract
1 cup plus 2 tablespoons all-purpose flour
1/2 teaspoon baking powder
1/4 teaspoon salt

1. Preheat the oven to 350 degrees. Generously butter a 9-inch glass pie dish and arrange the plums in the dish, cut side down.
2. Combine 1 cup of the granulated sugar and 1/3 cup water in a small saucepan and cook over high heat until it turns amber color, about 360 degrees on a candy thermometer. Swirl the pan but don't stir. Pour evenly over the plums.
3. Meanwhile, cream the 6 tablespoons of butter and the remaining 3/4 cup of granulated sugar in the bowl of an electric mixer fitted with the paddle attachment, until light and fluffy. Lower the speed and beat in the eggs one at a time. Add the sour cream, zest, and vanilla and mix until combined. Sift together the flour, baking powder, and salt and, with the mixer on low speed, add it to the butter mixture. Mix only until combined.
4. Pour the cake batter evenly over the plums and bake for 30 to 40 minutes, until a cake tester comes out clean. Cool for 15 minutes, then invert the cake onto a flat plate. If a plum sticks, easy it out and replace it in the design on the top of the cake. Serve warm or at room temperature.


Sunday, September 5, 2010

Happy Labor Day Weekend


Unbelievably, tomorrow is Labor Day which means summer is coming to a close.

Admittedly, I feel bittersweet about the end of summer this year. This summer was busier than I expected and with everything going on, I got into a bit of a funk and feel like I never really gave it my best shot. I didn't eat enough tomatoes, it was far too hot to garden, and I spent a lot of time indoors rather than out. Okay, I'm from the North so to me summers are for outdoor activities but everyone I know in the South says that's crazy talk and summers are spent indoors which is understandable when it's in the 90's and near 100% humidity every single day but I miss long hikes and lazy afternoons near a lake.

However, life is not all bad. I'm really looking forward to cooler weather (no surprise there) as well as sweaters, autumn produce, Halloween, and caramel themed desserts like this, this, and this. Further, fall has always been a favorite time of year for me because I think it's the most exciting fashion season of them all. I think Vogue agrees with me, given that the September issue generally weighs as much as Kate Moss and is chock full of the most beautiful spreads. I even love to pore over the ads. Don't even get me started on the knitting patterns that will be coming out as I may just swoon and forget that we're talking about summer! The fireflies haven't closed their nightly show for the year just yet!

Since this weekend is the perfect excuse to squeeze in a picnic, I wanted to share with you one of my favorite sandwiches of all time. This is the sandwich I instantly think of when I'm planning a picnic and it's no secret that I like to picnic often. It's even the sandwich we toted along on the picnic over which I promised Jared my hand in marriage (I told you I love picnics). What I love most about this sandwich is that not only are the main ingredients are either easy to come by or I already have them in my pantry but that it really takes substitutions well. No ciabatta to be found at you grocer? No problem; any toasted, crusty loaf would be delicious. No pancetta? I've used bacon in its place many, many times.

The dressing is what really makes the sandwich sing so substituting other things for what you have on hand or what is more pleasing to your palate is easy. The only thing I wouldn't do is skip the anchovy paste. I know, I know: I don't like fish, anchovies smell, etc. But trust me, you won't taste them as fish, but rather as a salty, savory note. Plus, the paste saves forever and has tons of extra uses once you get over the anchovy "yuck factor" (and believe me, it was definitely a food that took me some courage to try but now I use them all the time). Finally, this beauty travels well and can serve six if you have lots of extras to go with it or two if you count on extra sandwiches for lunch the next day. So now you have no excuses: pack one of these along on an outing and celebrate the last weekend of summer in style!


Caesar Club Sandwich
Originally Published in Barefoot Contessa at Home by Ina Garten.

Note: I have made many substitutions in this recipe but I'll give you my top two and just encourage you to be adventurous. First, I almost always have bacon on hand but I generally just buy pancetta for a special occasion so feel free to substitute there. Obviously, a better bacon will give you a better result but you don't need artisinal bacon to have a delicious sandwich! Second, my fiancee doesn't love arugula, so I have used baby spinach and romaine lettuce instead both of which work equally well and aren't as bitter as the arugula Ina calls for.

Makes 1 Giant Sandwich, easily sliced into 4 sandwiches or 6

2 split chicken breasts
4 oz thinly sliced pancetta (or bacon)
1 large garlic clove, chopped
2 tablespoons flat leaf parsley, chopped
1 1/2 teaspoons anchovy paste
1 teaspoon Dijon mustard
1 1/2 tablespoons fresh lemon juice
1/2 cup mayonnaise
1 large ciabatta bread
2 ounces baby arugula (or spinach, or romaine)
12 sun-dried tomatoes in oil
2-3 oz. Parmesan, shaved

Directions

1. Preheat oven to 350 degrees. Places chicken skin side up on a sheet pan. Rub the chicken with olive oil and sprinkle with salt and pepper. Roast for 35 to 40 minutes, until cooked through. Cool slightly, discard the skin and bones, and slice the meat thickly. Set aside.
2. Meanwhile, place the pancetta on another sheet pan in a single layer. Roast for 10 to 15 minutes, until crisp. Set aside to drain on paper towels.
3. Place the garlic and parsley in the bowl of a food processor fitted with a steal blade and process until minced. Add the anchovy paste, mustard, lemon juice, and mayonnaise and process again to make a smooth dressing. (Refrigerate dressing if not using immediately.)
4. Slice the ciabatta in half horizontally and separate the top from the bottom. Toast the bread in the oven, cut side up, for 5 to 7 minutes; cool slightly. Spread the cut sides of each piece with the Caesar dressing. Place half the arugula on the bottom piece of bread and then layer in order: the sun-dried tomatoes, shaved Parmesan, crispy pancetta, and sliced chicken. Sprinkle with salt and pepper and finish with another layer of arugula. Place the top slice of ciabatta on top and cute into desired size. Serve at room temperature.